

The first time you pick up a pencil, pen or brush to try to draw, just as we do with writing, if we want to learn quickly we start by systematically cultivating the skills we need. The ABCs of drawing. How to make the kind of mark, when we want to, where we want to, how we want to.
Truth is most of us will always be chasing this dragon, striving to get better than we are. No matter how good we get. There’s always someone better, and always something we want to improve in our own work. But a systematic approach applying the principles of deliberate practice, can help us improve much faster than random drawing. Being systematic with clear goals.
Great cartooning required great drafting and rendering skills. To gain efficiently targeted exercises are the best way to start. These are lessons that even know it’s been years for me, I still return to in my warmups and sketchbooks to keep them sharp.
Check your Grip!
How we hold our tools can have a big impact on the kinds of lines we make. There is not real “wrong way” exactly, but the best universal drawing grip is the tripod, the way most of us are taught to hold a pencil for writing. For drawing you’ll want to use a few simple variations on it to expand what it can do.
Simply extending the point of the pencil further away from your hand to draw larger forms and also always be careful not to over press and use a heavy hand.
In addition to the Tripods, there are the underhand and overhand sketching grips for large format sketching and shading. Some artists prefer them for a lot of their work, recently watching clips of him, noticed the talented and humble Erik Larsen draws with an overhand grip all the time. He told me online he’s used it since he was a kid. But as he alluded to on twitter and jokes about in this video, I wouldn’t necessarily recomend an idiosyncratic grip like that for ALL your drawing. Better to be able to use a few!
Here i’ve posted a handout guide to the grips i use, and what they are for, along with an embedded clip about this where I explain and demonstrate them a little. It’s not fancy rocket science, so do try, you can learn to use more than one!


Ok, now that you’ve got a grip, lets put some mileage on. We want to learn how to render with precision while still being a little relaxed. A good way to do that is to practice very simple line control, via hatching and line control exercises to start with.
Hatching.
Hatches are line made to shade, render texture and form, generally trying to achieve tonal range with line. fill in a row of boxes, or circles if you like, with hatch lines as you see here.

Then, apply Cross Hatching, like this! Try different angles and make note of the effect. Note in the first, draw the longest lines first, then change angle by about 15 degrees and draw half their length for the second row. Then reverse the angle 45 degrees or so and draw only half to two thirds as long. Feather the end of your strokes for a nicer effect.

Now fill long rectangular boxes like this with gradient [dark to light] cross hatches. rendering it in stages as seen here. I’ve used a different colour for each stage so you can see one complete layer from the next. Do the lighter colour/tone first for the most orderly and clean gradient.

In B&W it should look like this…

And now practice a variety of different hatching paterns as seen here! Look up more and try inventing your own too!
Like practicing handwriting, practicing this separate from drawing a bit is a good way to get a better hand of it.

Feathering and hatching with a Brush!
On this page, you’ll find similar examples of the same kinds of exercise, done with a brush!
Line Control.
First, watch this clip on some basic tips regarding drawing straight lines freehand.
Draw different lengths of lines, as seen here, and then repeat over top of them between 15 and 30 times. The goal is to NOT make the line thicker. To lay each new one as close to directly on top of the last as you can. The shortest line is made with just moving the fingers. Then move on to faster paced strokes and try to keep the line as strait as you can while still making the movement swift and almost gestural.
Then Isolate the stroke to the swinging movements of your wrist for shorter lines, the elbow for longer, and elbow and shoulder for longest! The simpler the movement, fewest joints involved. The cleaner and smoother it’s likely to be. The more muscles and joints involved in making it, the more chances there are for making it jump or bump.
Try doing continuous line drawings of various objects at first, and then people.

These are basicly contour drawings, where we never take our pen off the paper. Ultimately we want them to have an interesting and clean look mostly, though experimentation should be explored!
Once you put the pen on the page, don’t stop and DO NOT erase, just keep going, but think one or two steps ahead of where your hand is in the moment. To up the game a bit sometimes, try doing Blind Contour Drawings!
Trace the edges of the thing with your eye, and copy those movements with your hand. Try to keep your hand and arm relaxed, don’t use tension, in place of control.
THINK about where you will need to go, and how to get there interestingly.
Pattern Exercises.
Discover what your tools can do, and acquire a visual vocabulary of patterns you can use and utilize to describe various surfaces, embellish, and decorate your work with.
Some of these are basically hatching, but patterns a lot more diverse than just that. These examples are done with a brush but do them with pen and pencil too! Here’s a few from the classic Famous Artists Cartoon Course.
Be it naturalistic hair, plants, or highly decorative wallpaper, the ability to render patterns at all pays off big time. And practicing them is a great meditative way to increase your hand eye control and develop the focus you’ll need for your more ambitions drawings.
Apply the notion of deliberate practice. Start with the paterns you see in the sample sheet and then move on to invent and discover your own. For Ideas check out some I’ve posted here on the Dynamic Drawing site.
Look for paterns around you day to day, sketch them or take a photo and add them to your next practice session.

Or if you’re solving the problem in the middle of a drawing, pull out some scrap paper and try it out a few time on that in a systematic fashion before applying it to your final art.
Update: Pattern work and strokes with a Brush! I’ve made a clip deconstructing an example of work by Milton Caniff.
It goes along with a pair of videos, embedded in a playlist below. The first is a time lapse of my inking it, the second a breach down of the specific strokes and techniques used.
I also made this sheet of specific brush patterns to study and practice as well.
Expanding on Pattern study by diversifying your line
–
[ezcol_1half]
As you accomplish the initial goals of some degree of consistency, and control, entertain thinking about line quality more diversely.
Here’s a simple kind of glossary of Line Characteristics: [In the course of looking for good examples of ways to present this information, I’ve taken some strong notes from this interesting post on process by Gareth Sleightholme. Thanks for helping me refine by example, a good hierarchical presentation on this!].
Width – thick, thin, tapering, uneven: Length – long, short, continuous, broken: Direction– horizontal, vertical, diagonal, curving, perpendicular, oblique, parallel, radial, zigzag
Focus: Lines can be sharp, blurry, fuzzy, choppy. Feeling: Line can feel sharp, jagged, graceful, smooth? Have you seen this old short animated film?
Outlines: Lines made by the edge of an object or its silhouette. They can be definite, implied, graphic, or delicate. Note how all these modes of description can overlap? Yes that’s relevant to think about!
Contour Lines: Related to outlines but additionally describe the shape of an object and the interior detail. Contours find the edges of things across a surface, as well as the edges.
Gesture Lines: Lines that are energetic and catch a sense of the movement of an active figure. In our class we work on these a lot as a quick study sketching constraint. There are really two kinds of Gesture drawing, and a third use of the term ‘gestural line’. 1. ‘Full’ Gesture, scribbly lines that tend towards almost wild, drawn with speed typically, suggesting movement through forms rather than structure or contour as much. 2. ‘Line of action’, a distilled form of gesture line, typically one stroke, or a few, more designed and clarified than the previous. Seen used in animation and illustration a lot. Describes movement through a pose still but simplified. 3. Gestural lines, these can be contour or hatching, any line on a finished piece of art. But they have a very fluid or graceful feeling. Expressive, relaxed, ‘gestural’!
[/ezcol_1half] [ezcol_1half_end]
Hatching: Lines used in repeating patterns to create areas of tone/value, and/or texture. They tend to convey surface textures and lighting values. And by implication reveal form.
Drafted Lines: Confident and clear lines that appear unhesitating and smooth, sometimes bold but always clear and sharp. Lines that feel architectural or designed typically.
Sketchy Lines: Lines that capture the appearance of an object or impression of a place in an often looser, more general way, but combining many of the previous together. If you haven’t found it already, check out the blog of fellow Syn Studio teacher Marc Holmes for some amazing examples of sketching, and you’ll find my own collections of sketches, here, and as video here.
Calligraphic Lines: See also general term ‘Gestural lines’. Calligraphic is a Greek word meaning “beautiful writing.” Precise, elegant handwriting or lettering done by hand, or artwork that has a flowing quality and lines like an elegant handwriting. Some of the greatest illustrators work in a line like this frequently. And I think of the mark-making philosophy Paul Pope applies to his art, as having a Gestural, Calligraphic Feeling. I think Mike Mattesi’s ideas about Force also intersect with this with again a very Gestural carved and designed feeling.
Implied Line: Derived from our innate human disposition towards patternicity is our ability to “fill in gaps”. See between marks, identifiable elements. Also called Loss Line, it can be simple as leaving a space where we expect a line, as we see by these silhouettes by droemar on DevArt. It can occur compositionally as well, by arranging a group of objects. The Implied line can be the direction object[s] are pointing to, or the direction a person is looking at, the “Eyeline”.
Tangents: The impression of a line, or the continuation of one, created by aligned graphic relationships. The li8ne itself may be absent for part or all of it’s path.
[/ezcol_1half_end]
Form Exercises.
An extension of pattern exercises with an emphasis on control of form.

Start with practicing drawing as perfect a circle as you can with varying speed lines, those seen here are fast, gestural attempts.
At that speed the circles are harder to get evenly round, but it’s still good practice to try. For much slower attempts also try tracing the top of a bottle or a 2$ coin, then trace over that as close as you can several times, using the line as a track.
Just like with the basic line control exercises. Pay attention to the movements you make with your fingers and wrist. For circles roughly larger than 1.8″, 3 cm-the size of a 2$ coin CDN-you’ll need to use your elbow and shoulder more to make a nice smooth circle. Smaller should be doable with just the fingers and wrist. Do that about 10 times at least, then, start drawing lines
Experiment and try to find the speed you can be the most consistent at. Then as you come closer to being able to draw the circles consistently, gradually speed up the pace. Both to find and push your limits.
Do the same with ellipses like as seen on the bottom of the sample page. Try different angles of ellipses. Do a set freehand in a graduated series of angles. As seen at the very bottom.
With all these we’re looking for consistency and accuracy, but don’t stress if they aren’t perfect. This is a lot like handwriting exercises, if you desire a very high level of expertise then expect to practice more often to reach that.

Ad scale and angle control exercises. Draw 2 rows of triangles freehand, with perfect equal sides.
Line the second row up so it’s points meet up with the corners of the base of those above. Then enlarge them in the next row to be twice as wide and repeat. You don’t need to fill them in as i have here on the right, just the outlines.
You’ll know you got it right if the base and points of the larger triangles line up with every peek in the first row. You can lay down a ruled baseline for the first row but do it without guidelines for those that follow below.
Next try to tender ellipses in sets as seen on the left here, drawn as though they lay on a surface at an angle to the eye. This targets angles, and control over proportions as it specifically relates to the optical illusion of perspective.
This targets both drawing precise angles, and control over proportions and scaling object.
3D Form Exercises.
[ezcol_1half]
Draw organic and simple geometric forms.
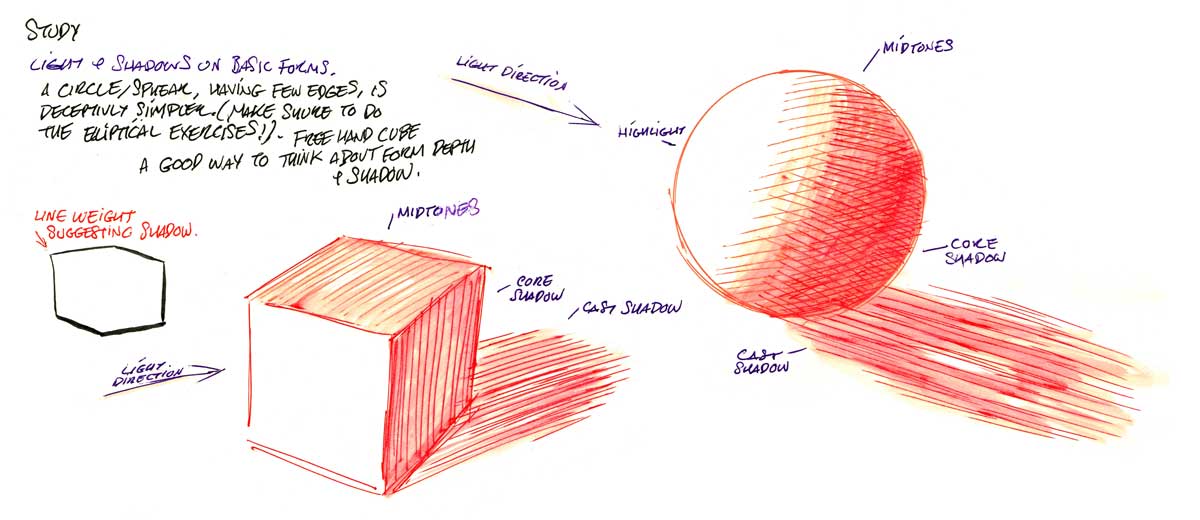
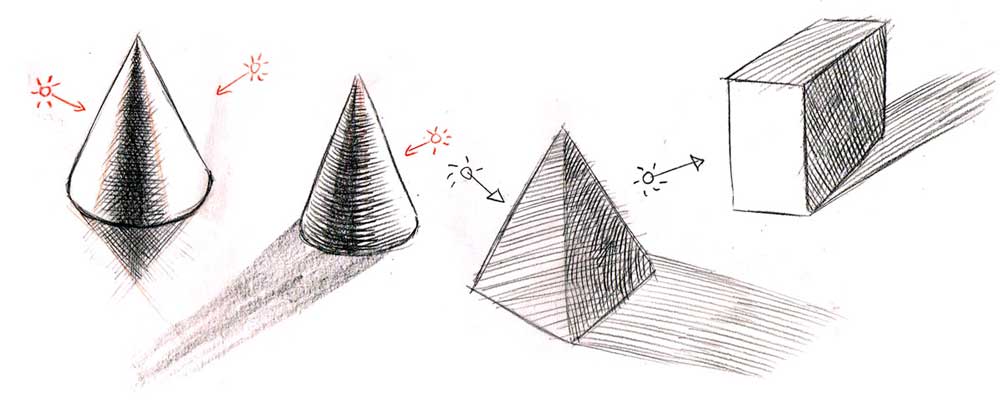
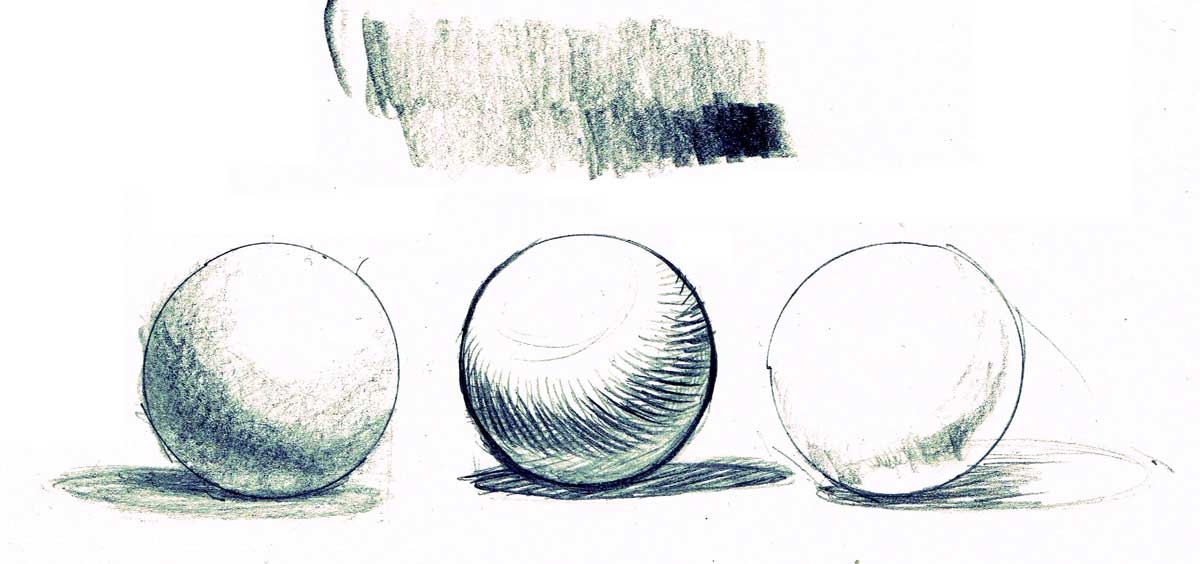
Then shade them with hatching and other methods. And then use hatching to shade it! Think about the highlights [areas that most directly face the light], midtones, shadow cores where the least light reaches the surface.
The cast shadows thrown on the other side of the object from the lightsource. And reflective light, light that bounces off the surface back to the form. Detailed in this page of studies. For the geometric forms, i’ve given you examples of balls, cubes and cones. Done in both pencil pen and brush. Try it out with a few different shading techniques.
The structures of lighting effects are fairly simple. Where the light hits directly, will be the brightest. Where the least can reach, it will be in the most shadow. Think of the rays of light emanating like lines from the source, where it strikes the object it will be lit, where it can’t reach will be a shadow of some kind. That leads to what breaks down to four zones typically.
[/ezcol_1half] [ezcol_1half_end]
Highlights: The brightest areas where the subject is reflecting the light source most efficiently. The number of highlights on a subject is limited only by the number of reflective surfaces on the subject, the number of light sources, and the ability of the surfaces to reflect light. The shape of the highlight depends on the surface of the subject.
Midtones: A tone is midway in between the highlight and the shadow. typically the “true” color and consistency of the object. The highlights are brighter than the “true” color, and the shadows are darker than the “true” color.
Shadows: The darkest area of the surface shadows can have sharp edges between it and the midtone or it can just sort of gradually blend into the midtone. In addition to the shadows on the object itself, there’s also the cast shadow. This is the shadow that the object is making by blocking the light. This shadow may be sharply defined or soft, depending on brightness and proximity of the light casting the shadow.
[/ezcol_1half_end]


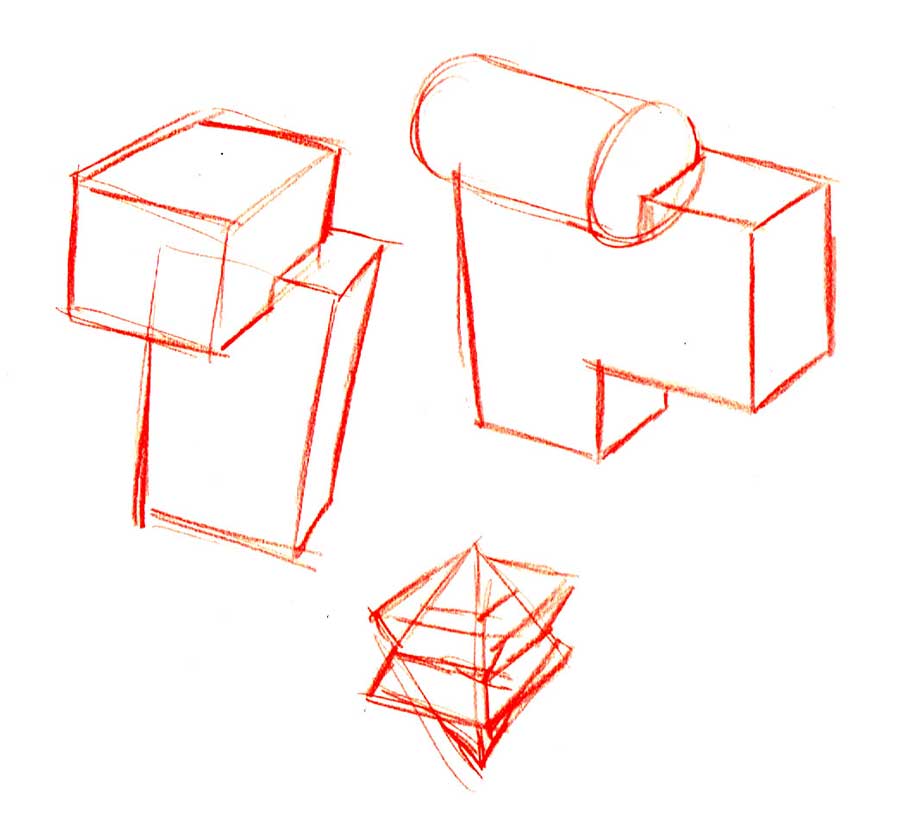
To up your game next try doing it with some compound forms like this.

Next, for your organic forms, start with an organic silhouette like these. Then imagine and plot out the surface topography with a simple grid as seen here. We’re making this up, i’ve kept them fairly simple while trying to extrude something interesting out of it.

I recommend a very light line when starting, [like using an H2 pencil and don’t press hard] or employ a col-erase pencil like I do here for the mapping of the contours so it doesn’t interfere wit the shading. The lines should look as they have been drawn over the surfaces, following the contours as they change. And again use hatching to shade it! Think about the highlights [areas that most directly face the light], midtones, shadow cores, cast shadows, and reflective light.
